This tutorial will cover on how to create a basic LibreOffice Dialog and adding various controls such as TextBox. Also it covers on how to read the control values using Calc Macros.
Table of Contents
Adding a Dialog
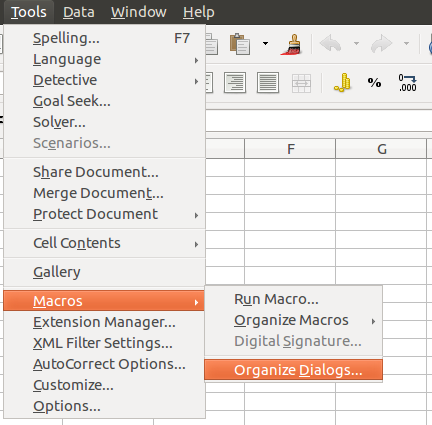
To add a Dialog in LibreOffice Calc, select from menu: Tools -> Macros -> Organize Dialogs…
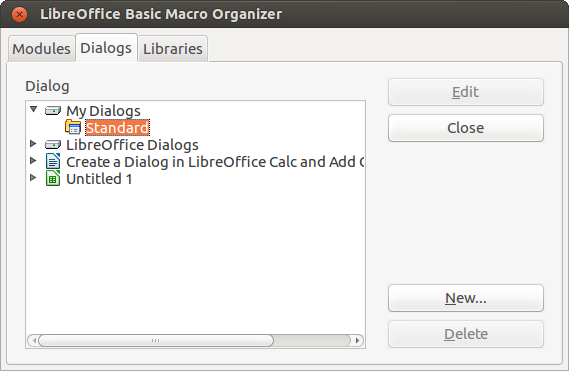
Once above options is chosen, below LO Basic Macro Organizer would open. On the Dialog Tab, click New button.
On the New Dialog pop-up , give a name to your dialog. For this tutorial, lets keep it as default Dialog1. Press OK.

You can see the Dialog1 is come up under My Dialogs -> Standard -> Dialog1.
Adding a TextBox Control
On the same LO Basic Macro Organizer, click EDIT while Dialog1 is selected.

Entire Dialog editor would open inside LO Calc. Now its time to add some controls. For simplicity, I would add a textbox and a button.
The controls are placed at the bottom of the screen. Select a control and drag your mouse inside the Dialog to place your desired control. For this tutorial, add a textbox and a button. If you are unable to see the toolbox at the bottom of the screen, select from menu: View -> Toolbars -> Toolbox.
The Dialog should look like this now.

To set the properties of each controls, click/select the control, then you can see the properties window opened on the bottom-left side of the editor. On the properties window, the ‘name’ value of the General tab would be used to identify the objects inside Macro.
For textbox the default name is: TextField1, for the button it is: CommandButton1.

Now, we are all set with the Dialog, for now. Lets write the macro.
The Macro
Using a LO Calc macro, I will show how to open the dialog, read the contents of the textbox and some content from Calc cell from sheet1. Then show the content of the textbox and contents from Cell as a message box prompt while the button is clicked.
Go to the macro editor (click the Module1 tab) and create two functions as below.
Tip: Read the tutorial on how to create a Macro
Dim oDialog1 As Object

Sub StartDialog1()
    ' Code for initiating and showing the dialog
End Sub

Sub readDialog1()
    ' Read the content
End Sub
Declare an object oDialog1 as Object type outside of the functions scope. Because we need to access the Dialog in a difference function.
In StartDialog1() function we will load the “Tools” library. As per current design of OpenOffice/LibreOffice, the libraries are implemented as UNO interfaces, NOT as UNO Services. When OpenOffice/ LibreOffice is initiated, not all the basic libraries are loaded to save time. Thus if you have created your own library say, Library1, you need to load the library explicitly inside basic to identify the user defined functions. To load any library, use the built-in properties BasicLibraries.LoadLibrary.
For this tutorial, we will use the OpenOffice/LibreOffice predefined library “Tools” with below code. LoadLibrary property will load the Tools library and then using LoadDialog() function and Execute function we will show the created Dialog.
Sub StartDialog1()
    BasicLibraries.LoadLibrary("Tools")
    oDialog1 = LoadDialog("Standard", "Dialog1")
    oDialog1.Execute()
End Sub
Alternate Code
Using below snippets also, a dialog can be opened.
    DialogLibraries.LoadLibrary("Standard")
    oDialog = CreateUnoDialog(DialogLibraries.Standard.Dialog1)
Now its time to read the content of TextBox and 1st cell of Sheet1 of Calc i.e. A1. To get a hold of a control, use GetControl( controlName ) function of the dialog object. Once the object is ready, you can use various properties available. To get the text entered in the textbox, use control’s Text() property.
Sub readDialog1()
    Dim cell_val
    oT1 = oDialog1.GetControl("TextField1")
    cell_val = ThisComponent.Sheets(0).getCellByPosition(0,0)
    msgbox cell_val.String & chr(13) & "Value from controls: "  & oT1.Text
End Sub
Before we run the macro, we need to assign the readDialog1() function to button click event. To do that, go back to Dialog Editor and select the commandbutton. In the properties window, select Events tab. Assign the readDialog1() function by clicking the Execute Action button and choosing the macro.
Tip: Click here to learn more on how to assign a macro to a form control / button.
Run
Put any text in Calc sheet1’s cell A1 – for this tutorial, I have put “Hello World”.
Open the Macro editor and run the function StartDialog1(). The dialog would execute and popup. Now, put some text on the text box and click the button. You should see the text from the textbox from the dialog as well as from the Calc sheet1’s A1 cell.

This way, you can work with dialogs and controls via basic Macro in OpenOffice/ LibreOffice Calc.
Video
Watch the video of this tutorial.
Function References – Used in this article
var = Dialog.GetControl(“ControlName”) : Returns handle to the control object
TextBoxControl.Text() : Returns Textbox value [String]
BasicLibraries.LoadLibrary(“LibraryName”)
var = LoadDialog(“LibraryName“, “DialogName“) : Returns handle to the dialog.
DialogHandle.Execute()
Complete Macro
To run, Copy and paste this entire code block below in Macro Editor of LibreOffice.
Dim oDialog1 As Object

Sub StartDialog1()
    BasicLibraries.LoadLibrary("Tools")
    oDialog1 = LoadDialog("Standard", "Dialog1")
    oDialog1.Execute()
End Sub

Sub readDialog1()
    Dim cell_val
    oT1 = oDialog1.GetControl("TextField1")
    cell_val = ThisComponent.Sheets(0).getCellByPosition(0,0)
    msgbox cell_val.String & chr(13) & "Value from controls: "  & oT1.Text
End Sub
Looking for Something Else?
If you are looking for something else in LibreOffice macro tutorials, Or, wants to learn more about it, please follow below link for complete Macro Tutorials Index:


